
(Warning: it's about to get mathy up in here!)
But, before we go there, have I mentioned how much I enjoy sewing custom orders? I love the challenge of figuring out a new type of project that I haven't tackled before. I get to add some new skills to my sewing toolbox, and I get to (hopefully) make someone happy at the same time... win-win, in my books.
But, before we go there, have I mentioned how much I enjoy sewing custom orders? I love the challenge of figuring out a new type of project that I haven't tackled before. I get to add some new skills to my sewing toolbox, and I get to (hopefully) make someone happy at the same time... win-win, in my books.
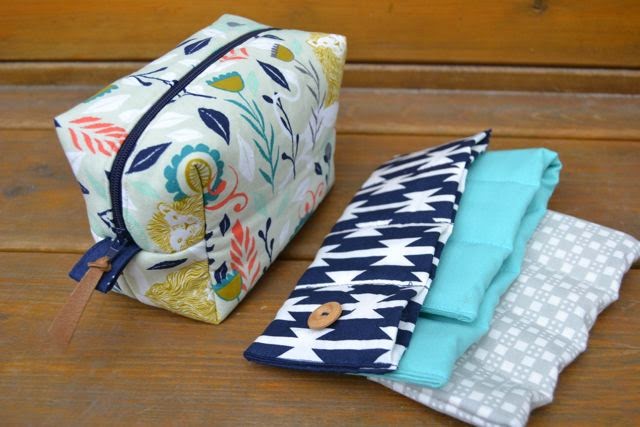
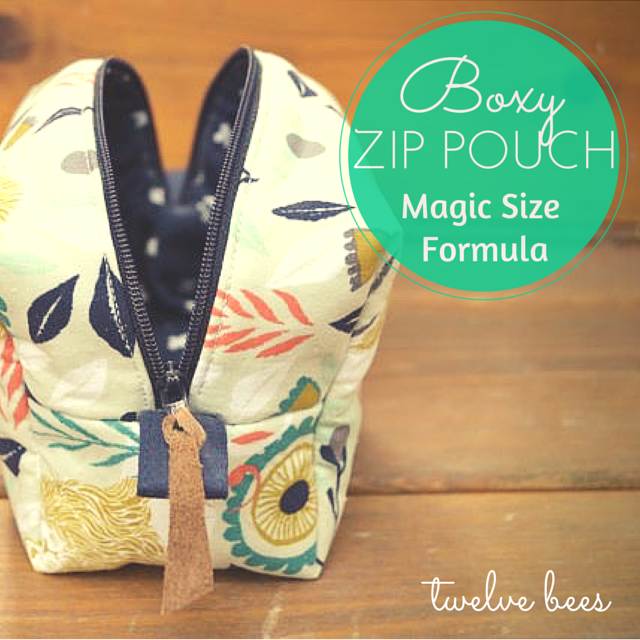
This time, a friend asked me to sew a zipper pouch to hold her essential oil droppers and roller bottles. She gave me the dimensions of her bottles, asked only that the pouch be pretty and close with either a zipper or a fold, and include some sort of insert to keep the glass bottles separated and protected when she throws them in her purse.

.png)
Is that confusing enough? Ha. The graphic is a bit of a mess, but I wanted to share it since it took me the better part of an hour to track down the formula and then figure out how to use it to get the size of pouch I was after. Now, hopefully, you won't have to (as long as it doesn't take you an hour to figure out what I'm talking about!). Here's how I did my calculations:
I wanted my finished pouch to measure 7"(L) x 3"(W) x 4"(H), and I'd use a seam allowance of 1/2".
So, I cut my two outer and two lining pieces 12" x 8", which I calculated as follows:
Length
= L + H + 2 x seam allowance
= 7" + 4" + (2 x 1/2")
= 12"
Width
= H + W + 2 x seam allowance
= 4" + 3" + (2 x 1/2")
= 8"
Box Corners
= 1/2 H
= 1/2 (4")
= 2" up from corner point
Once you have your pieces cut out, you just have to follow one of many great tutorials out there for sewing a lined boxy zipper pouch, remembering to box the corners using the measurement you worked out for your size of pouch.
The "magic formula" worked like a charm for me. My finished pouch measures approximately 7" long x 3" wide x 4" high, just what I was aiming for. I used a little piece of leather as a zipper pull accent, which I love alongside the Cotton + Steel fabric I used for the outside and lining of the bag. I also made three little inserts to hold the essential oil bottles, which should work well (and look cute, too).

I listed it in my Etsy shop for her to buy - my first Etsy listing, and my first sale! I'm aiming to get a few more things listed in the coming weeks, so hopefully it's just the first of many. Next on the learning list - product photography...

Hi, I saw your friend share about this and had to find out more. Love it and Is love one too. Be in touch with email or I messaged you on Etsy as well.
ReplyDeletecindy_windsor1@yahoo.com
Thanks Cindy! I'm glad you got in touch via Etsy. Looking forward to making you a custom bag of your own. :)
DeleteThis comment has been removed by a blog administrator.
ReplyDeleteHow did you make the inserts?
ReplyDeleteThanks for sharing!
ReplyDeleteHi:
ReplyDeleteI have a question. I pretend to make a boxy bag 7" long, 4" wide and 3" tall. Since for personal reason I'll be using one piece of main fabric and one piece of lining, should I add both widths and have a piece with this measurement or should I add a seam allowance to the width? According to your graph, I should have an 11" Lenght by a 7" Width. Should my fabric be 11 x 14 or 11 x 14 + 2 (1/2 seam allowance)? Thanks for the tutorial and for your time in reading and answering
How do you figure out what size zipper to use? Thanks!
ReplyDeleteThanks very much for this information. I made (practice) a few boxy pouches and the formula is working very good. I made 4 pouches in different sizes and they look great. Thanks again.
ReplyDeleteThank you very much for this simple & clear formula. I've been searching for months to find one that works. Truly grateful for all your hard work in preparing this excellent formula and sharing it with us. All the very best. Louise, Western Australia
ReplyDeleteOMG! thank you so much. So easy now to make a nice boxed pouch. You don't wanna know how many tries i made, too long, too high, too small, not wide enough .....
ReplyDeleteThank you so much for sharing! I've been trying to figure this out for approximately 3yrs! :(
ReplyDeleteHello do you cut your two big pieces in half once you figure out the size? Or do you make the Box pouch using the one piece fabric method? Thanks in advance
ReplyDeleteI cut two pieces of outer fabric and two pieces of lining fabric, as per the tutorials I linked to in the post. So the formula gives you the dimensions for those pieces (you don't cut one big one and cut it in half, you cut two of the size you figure out using the formula). I hope that helps!
DeleteHi Becky,
ReplyDeleteI so appreciate you sharing this and I can't believe I've only just found this post! I also make custom bags and purses and I too have flipped back and forth between multiple boxy pouch tutorials to come up with a method that I am happy with. I have to admit that I was still searching because what I wanted was exactly this! I need to be able to adjust the size and proportions without having to 'design' from scratch every time for something that's essentially the same! I feel like I could have figured this out but haven't put the time in. Anyway, I appreciate you! :-)
Thank you so much for this magic formula. I want to make a boxy bag of a particular size but wasn't sure how to adapt my pattern to get it right. Here goes, wish me luck!
ReplyDelete